Storage container types and what works best
Why Your Container Choice Actually Matters
The Four Main Container Categories
Most meal prep containers fall into one of four material categories: plastic, glass, stainless steel, and silicone. Each has distinct advantages and legitimate drawbacks that go beyond marketing claims.Plastic Containers: The Workhorse Option
Plastic remains the most common meal prep container material in American kitchens, and for good reason. It's lightweight, affordable, and widely available at retailers from Walmart to Target to your local grocery store. But not all plastic containers are created equal, and understanding the differences can save you money and frustration. The key distinction lies in the plastic type. Look for containers marked with recycling codes 2 (HDPE), 4 (LDPE), or 5 (PP). These are generally considered food-safe and durable enough for regular use. Code 5 polypropylene is particularly well-suited for meal prep because it handles heat reasonably well and resists cracking.According to the FDA's food safety guidelines, containers marked "microwave-safe" have been tested to confirm they don't leach harmful chemicals at typical microwave temperatures. However, this designation doesn't guarantee safety for extended heating or use with high-fat foods, which can reach temperatures that stress plastic polymers beyond their tested limits.
The major advantage of plastic is practicality. A set of 24-32 containers typically costs $15-35 at major US retailers. They stack efficiently, weigh almost nothing in your work bag, and won't shatter if your toddler knocks them off the counter. For people who prep large quantities or need to transport meals daily, these factors matter more than aesthetics. The downsides are real, though. Plastic absorbs odors from strong foods like garlic, onions, and curries. It stains easily from tomato-based sauces and turmeric. Over time, even high-quality plastic containers develop micro-scratches that harbor bacteria and make cleaning difficult. Most plastic containers need replacement every 12-18 months with regular use.Glass Containers: The Premium Option
Glass has gained significant market share in the US over the past decade, driven by concerns about plastic safety and environmental impact. Brands like Pyrex, Anchor Hocking, and Glasslock have expanded their offerings to meet demand, and Costco now stocks multi-piece glass sets as standard inventory. The benefits are substantial. Glass doesn't absorb odors or stains. It's inert, meaning no chemicals leach into your food regardless of temperature or acidity. You can move a glass container directly from the freezer to the microwave without worrying about degradation. And honestly, food just looks better in glass—the visual appeal matters when you're eating the same prepped meals four days in a row.Pro Tip:If you're transitioning to glass, start with 2-cup round containers rather than rectangular sets. Rounds fit better in most refrigerator door compartments and standard microwave ovens. Once you've confirmed they work with your storage and heating setup, expand to rectangular sizes for efficient cabinet storage.
The drawbacks come down to weight, cost, and breakage risk. A glass container weighs roughly three times as much as an equivalent plastic one, significant when you're carrying lunch daily on public transit or up several flights of stairs. Quality glass containers cost $4-12 each, compared to $1-3 for plastic. And while tempered glass resists breaking, it's not immune. A dropped container on a tile or concrete floor will almost certainly shatter.Stainless Steel Containers: The Durable Alternative
Stainless steel occupies a smaller but growing niche in the meal prep world. Brands like U-Konserve, LunchBots, and ECOlunchbox target consumers willing to pay premium prices for durability and plastic-free storage. The advantages are compelling if they match your needs. Stainless steel is virtually indestructible under normal use. It doesn't retain odors, stains, or flavors. It's lighter than glass while being more durable than either glass or plastic. For people who prioritize environmental impact, a single stainless steel container can replace dozens of plastic ones over its lifespan. The limitations are significant for typical American meal prep workflows, though. You cannot microwave stainless steel, period. This means transferring food to a separate dish for reheating, which adds steps and dishes to your routine. Most stainless containers aren't fully airtight, making them unsuitable for liquid-heavy meals or long-term storage. And the cost is substantial: individual containers range from $12-28, with sets easily exceeding $100.Silicone Containers: The Flexible Newcomer
Silicone has emerged as a legitimate option over the past five years, with brands like Stasher popularizing silicone bags and companies like W&P expanding into full container lines. The material offers unique advantages that neither plastic nor glass can match. Silicone is genuinely flexible, which means containers can collapse for storage when not in use, a major advantage if you're working with limited cabinet space. It handles extreme temperatures well, moving safely from freezer to microwave to dishwasher. It's lightweight like plastic but doesn't have the same staining and odor issues. The downsides center on stability and cost. Flexible containers can be difficult to fill neatly, especially with liquid or semi-liquid foods. They don't stack as securely as rigid containers. And the price point is high: a quality silicone container costs $8-15, comparable to or exceeding glass.Matching Container Types to Your Actual Life
The "best" container depends entirely on your specific situation. Here's how to think through the decision based on common American lifestyles and constraints.The Commuter and Office Worker
If you carry your meals on public transportation or walk any significant distance, weight matters more than you might think. A typical meal prep day involves breakfast, lunch, and possibly snacks, easily three to four containers. The difference between plastic and glass can mean an extra two to three pounds in your bag daily. For this scenario, I typically recommend a hybrid approach: plastic for everyday lunches, with one quality glass container for meals where presentation matters or when you're eating at your desk and want to reheat directly. Stainless steel works well for cold meals like salads, where the microwave limitation doesn't apply.The Home-Based Worker
When your commute is walking from bedroom to kitchen, container weight becomes irrelevant. This opens up glass as a practical everyday option. The ability to prep, store, reheat, and serve in the same container reduces dishes and simplifies your routine. Home-based workers should also consider portion-specific containers. Having dedicated containers for breakfast (typically 1-1.5 cup capacity), lunch (2.5-3.5 cups), and snacks (0.5-1 cup) streamlines both prep and portion control. Glass sets with color-coded lids make this easy to maintain.The Fitness Enthusiast
People tracking macros or following specific nutrition protocols need containers that support precision. Clear measurement markings are essential, estimating portions defeats the purpose of tracking. Glass containers with etched measurement lines or high-quality plastic containers with molded measurement indicators work best.A study published in the International Journal of Behavioral Nutrition and Physical Activity found that people who used portion-controlled containers lost an average of 1.8 more pounds over 12 weeks compared to those using standard plates and containers, even when both groups followed identical dietary guidelines. The container structure itself supported better adherence.
Fitness-oriented meal preppers should also consider compartmentalized containers. The classic "bento box" style keeps proteins, carbohydrates, and vegetables separate, preventing the soggy-salad problem and making macro tracking more accurate. However, these containers are harder to find in glass and typically require hand-washing to maintain seal integrity.The Family Household
Families face a different set of challenges: volume, variety, and durability. When you're prepping meals for four people, you need containers that stack efficiently in a refrigerator that's also storing milk, juice, condiments, and leftovers from last night's dinner. For families, I recommend standardizing on one or two container sizes that stack well together. Mixing brands and sizes creates cabinet chaos and refrigerator inefficiency. Choose containers with flat lids rather than recessed ones—they stack more securely and create usable surface area in the fridge. Durability becomes critical with children in the house. Even the most careful child will eventually drop a container. For family use, I suggest keeping glass containers for adult meals and refrigerator storage, while using quality plastic for kids' lunches and portable snacks.Container Shape and Size: The Overlooked Variables
Material gets most of the attention, but shape and size often determine whether your meal prep system actually works in practice. These factors interact with your refrigerator layout, microwave size, cabinet space, and typical meal composition.Rectangular vs. Round Containers
Rectangular containers maximize space efficiency in both refrigerator and cabinet storage. They fit neatly against each other without the wasted gaps that round containers create. For most meal prep applications, rectangular is the better choice. However, round containers have specific advantages. They heat more evenly in microwaves because there are no corners where heat concentrates. They fit better in standard US microwave ovens, which are typically designed for round plates. And they work well for liquid-based meals like soups and stews, where corners can trap food and make cleaning difficult.Standard Sizes and Their Best Uses
Understanding standard container sizes helps you build a coherent system rather than accumulating random mismatched pieces. Here's a breakdown of common sizes and their optimal applications:| Container Size | Capacity (cups) | Best Applications | Typical US Price Range |
|---|---|---|---|
| Snack/Dressing | 0.25 - 0.75 | Nuts, seeds, salad dressing, dips, pre-measured ingredients | $0.75 - $3.00 each |
| Small | 1.0 - 1.5 | Breakfast portions, side dishes, single-serving desserts, cut fruit | $1.50 - $5.00 each |
| Medium | 2.0 - 3.0 | Standard lunch portions, grain bowls, pasta dishes, meal components | $2.00 - $7.00 each |
| Large | 3.5 - 5.0 | Dinner portions, family-style servings, batch storage, salads | $3.00 - $10.00 each |
| Extra Large | 6.0+ cups | Full meal prep batches, large family portions, entertaining leftovers | $5.00 - $15.00 each |
Pro Tip:Before buying any container set, measure your refrigerator shelves, microwave interior, and cabinet storage spaces. Standard US refrigerator shelves are 15-16 inches deep, but door compartments vary widely. A container that's perfect for your meal portions is useless if it doesn't fit in your actual appliances.
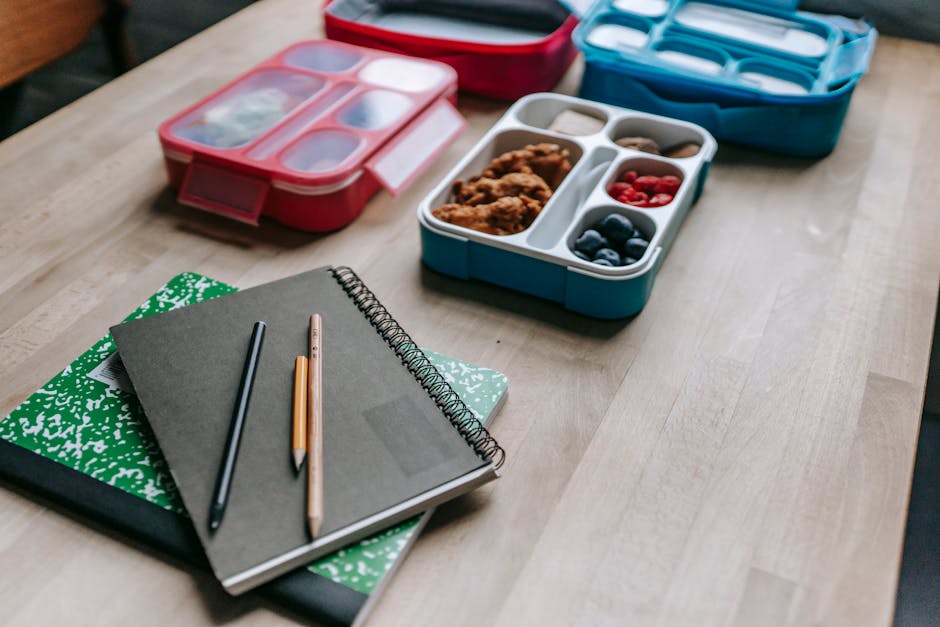
The Compartment Question
Compartmentalized containers (often called bento or divided containers) offer clear benefits for certain meal types. They keep wet and dry components separate, preventing the dreaded soggy-crouton situation. They make portion control visual rather than measured. And they can make meals feel more substantial by presenting multiple distinct components. The trade-off is reduced flexibility. A three-compartment container can't hold a large salad or single-dish meal efficiently. The dividers also reduce total capacity, a three-cup container with dividers might only hold 2.5 cups of actual food due to the divider volume and the difficulty of filling corners. I recommend having some compartmentalized containers in your system, but not as your primary storage. One or two per person works for meals that benefit from separation; standard single-compartment containers handle everything else.Lid Quality: The Make-or-Break Factor
More than any other factor, lid quality determines whether you'll be happy with your containers long-term. A great container with a poor lid becomes a source of daily frustration. Unfortunately, lid quality is difficult to assess in the store, you often don't discover problems until you've used the containers for weeks.Seal Types and Their Trade-offs
The four main lid seal types each have distinct characteristics:Snap-lock lidsuse hinged clips that secure the lid to the container base. These provide the most reliable seal for liquid containment and are generally airtight. The downside is that the clips can break off over time, and the lids don't stack efficiently. Glasslock and similar brands use this system effectively.Press-fit lidsrely on friction and flexibility to create a seal. These are the most common type for plastic containers and many glass ones. Quality varies enormously, some create an excellent seal, while others barely stay attached. Look for lids with some flexibility; rigid press-fit lids rarely seal well.Screw-top lidsare primarily found on round containers, especially those designed for liquids. They create reliable seals and are easy to verify (you can feel when they're properly closed). However, they're slower to open and close, and threads can wear over time.Silicone-seal lidsincorporate a separate silicone gasket that creates an airtight barrier. These offer the best seal quality but require removing and cleaning the gasket separately. The gaskets can also degrade or get lost, rendering the container less effective.Warning Signs of Poor Lid Quality
When evaluating containers, check for these red flags:- Lids that require significant force to close (they'll only get harder to use over time)
- Gaps visible between lid and container when closed
- Lids that warp after one dishwasher cycle
- Multiple lid sizes that look identical (you'll never match them correctly)
- Lids without clear "front" indicators (frustrating every time you use them)
- Thin, flexible lids on rigid containers (seal will degrade quickly)
Temperature Performance: Freezer to Microwave
Meal prep requires containers that can handle temperature extremes. You might prep a batch of chili on Sunday, freeze half for next week, refrigerate the rest, and reheat individual portions throughout the week. Your containers need to survive this cycle without degrading.Freezer Performance
Freezer storage presents specific challenges. As food freezes, it expands, sometimes by 5-10% depending on water content. Containers that are completely full when refrigerated can crack or pop open in the freezer. Glass containers can handle freezer storage, but they require care. Rapid temperature changes cause thermal shock, which can shatter even tempered glass. Never move a glass container directly from freezer to hot microwave; let it thaw in the refrigerator first or use the defrost setting. Plastic containers vary widely in freezer performance. Thin, inexpensive containers become brittle at freezer temperatures and crack easily. Higher-quality containers with some flexibility handle freezing better. Look for containers specifically labeled freezer-safe.The USDA recommends using freezer-safe containers with at least 1/2 inch of headspace to accommodate expansion. Overfilling containers before freezing is one of the most common causes of container failure and food waste.
Microwave Performance
Microwave reheating is where material choice matters most. Glass and plastic both work in microwaves, but with different considerations. Glass heats evenly but gets hot, sometimes dangerously so. The container can be scorching while the food inside is only warm. Always use caution removing glass containers from microwaves, and consider using a potholder or towel. Plastic designated microwave-safe is convenient but has limitations. High-fat foods (cheese, fatty meats, oils) can exceed the temperatures plastic is designed to handle. If you regularly reheat foods with high fat content, consider transferring to glass or ceramic for microwaving. Stainless steel cannot go in the microwave at all. If you invest in stainless containers, you'll need a separate microwave-safe dish for reheating.Building Your Container System: A Practical Framework
Rather than prescribing a specific set of containers, I'll offer a framework for building a system that matches your actual needs. This approach accounts for your specific constraints and prevents the common mistake of buying containers that look good in the store but don't work in your life.Step 1: Audit Your Current Situation
Before buying anything, spend a week tracking how you actually eat and prep. Note: - How many meals do you prep per session? - How many days do prepped meals need to last? - Do you transport meals, or eat them at home? - What types of meals do you typically prep (wet, dry, mixed)? - How much refrigerator, freezer, and cabinet space can you dedicate to containers? This audit prevents buying containers that don't match your real needs. The person who preps three days of lunches has different requirements than someone who preps two weeks of complete meals.Step 2: Determine Your Priority Order
Rank these factors from most to least important for your situation: - Durability and longevity - Weight and portability - Cost - Environmental impact - Aesthetics and presentation - Ease of cleaning Your ranking determines which material makes sense as your primary container type. Someone who prioritizes durability and environmental impact will choose differently than someone focused on cost and portability.Step 3: Start Small and Test
Never buy a 24-piece set of any container type without testing first. Purchase 2-3 individual containers in your preferred material and size. Use them for two weeks of normal meal prep. Note what works and what doesn't. This testing phase reveals issues you can't anticipate in the store: maybe the rectangular containers don't fit in your lunch bag, or the lids are harder to close than they seemed, or the size is wrong for your typical portions.The best container system isn't the one with the highest ratings or the most features—it's the one you'll actually use consistently. I've worked with clients who had beautiful glass container collections that sat unused because they were too heavy to carry, and others whose cheap plastic systems worked perfectly for years because the containers matched their actual needs.