Reheating techniques for meal prep
Why Reheating Deserves More Attention
You spent your Sunday afternoon batch-cooking chicken thighs, roasting sweet potatoes, and portioning out grain bowls. By Wednesday, that same food tastes like a rubbery punishment. The problem usually isn't your cooking—it's your reheating. For American professionals juggling commutes, hybrid work schedules, and limited lunch breaks, how you warm up prepped meals can make the difference between a satisfying lunch and another $16 Chipotle run.
As a registered dietitian based in Chicago, I've watched clients transform their meal prep results without changing a single recipe. The fix? Matching the right reheating method to the right food, understanding your equipment, and building a few repeatable habits. This guide breaks down what actually works in real US kitchens, from studio apartments with a single microwave to homes with full appliance suites.
Most meal prep advice stops at the storage stage. Cook, cool, portion, refrigerate, done. But reheating is where texture, flavor, and food safety all hang in the balance. The USDA's Food Safety and Inspection Service recommends reheating leftovers to an internal temperature of 165—F, yet temperature is only part of the story. A chicken breast hit with two minutes of high microwave power will hit 165—F and still be nearly inedible, dry on the outside, unevenly warm inside, with a strange warmed-over flavor.
The stakes are practical and financial. Americans throw out roughly30 to 40 percent of the food supply, and household food waste costs the average family about $1,500 per year. Better reheating means fewer discarded leftovers, less reliance on takeout, and actual enjoyment of the meals you already made.
Key data point:A 2023 survey by the American Heart Association found that 62% of US adults who meal prep regularly cite "food getting boring or tasting bad by midweek" as their top reason for abandoning the practice, ahead of time constraints or cost.
Understanding Your Reheating Toolkit
American kitchens vary enormously, but most meal prep reheating happens across four methods: microwave, conventional oven, stovetop, and countertop appliances like toaster ovens and air fryers. Each has distinct strengths, weaknesses, and best-use cases.
The Microwave: Speed with Tradeoffs
About 96% of US households own a microwave, according to the US Energy Information Administration's Residential Energy Consumption Survey. It's the default reheating tool for good reason: a plate of food goes from refrigerator-cold to steaming in two to four minutes. But microwaves heat unevenly because they excite water molecules, creating hot spots and leaving other areas lukewarm. Foods with uneven moisture distribution, like rice dishes with dry edges and wet centers, suffer the most.
Microwave wattage also varies widely. Compact office microwaves often run 600 to 800 watts, while full-size home models range from 900 to 1,200 watts. Higher wattage means faster heating but also greater risk of overcooking edges before the center warms through. If you're reheating at work, you may be working with significantly less power than your home appliance.
Pro Tip:Cover your food with a damp paper towel or a microwave-safe lid with a vent. The trapped steam helps even out heating and prevents surface drying. For dense proteins like chicken or pork, use medium power (50-70%) in 60-second bursts, flipping or stirring between intervals. This takes longer but preserves texture dramatically.
The Conventional Oven: Slow but Reliable
For casseroles, roasted vegetables, and baked proteins, the oven remains the gold standard for texture. Dry heat recrisps surfaces and warms food gradually without the moisture loss of aggressive microwave heating. The downside is time: preheating plus reheating can take 25 to 40 minutes, which makes the oven impractical for most weekday lunches unless you work from home with a flexible schedule.
Ovens excel for batch reheating. If you're feeding a family or warming multiple meals at once, the efficiency improves. A 9x13 inch casserole dish of prepped enchiladas, covered with foil for the first 20 minutes and uncovered to finish, will reheat more evenly and taste fresher than any microwave equivalent.
The Stovetop: Precision for Wet Foods
Soups, stews, stir-fries, and sauced proteins respond beautifully to stovetop reheating. You can monitor progress visually, adjust heat in real time, and add small amounts of liquid to restore consistency. A cast-iron or stainless steel skillet also lets you rebuild texture, reheating prepped rice in a hot pan with a little oil creates crispy edges that no microwave can replicate.
The stovetop requires more active attention than other methods, which makes it less ideal for multitasking. But for dinner reheating when you're already in the kitchen, it's often worth the extra few minutes.
Countertop Appliances: The Middle Ground
Toaster ovens and air fryers have exploded in popularity in American households. The NPD Group reported that air fryer sales in the US grew by over 60% between 2019 and 2022, and many of my clients now use them as their primary reheating tool. These appliances preheat quickly, use less energy than a full oven, and produce superior texture for fried or roasted foods.
An air fryer at 350—F will reheat prepped chicken tenders, roasted Brussels sprouts, or even leftover pizza in 5 to 8 minutes with a crisp exterior and moist interior. Toaster ovens work similarly well for flat or spread-out foods. The main limitation is capacity, most countertop models can't handle a large container or multiple meals at once.
Key data point:The average US household air fryer consumes roughly 1,500 watts and preheats in 2 to 3 minutes, compared to 10 to 15 minutes for a full-size electric oven drawing 2,500 to 5,000 watts.
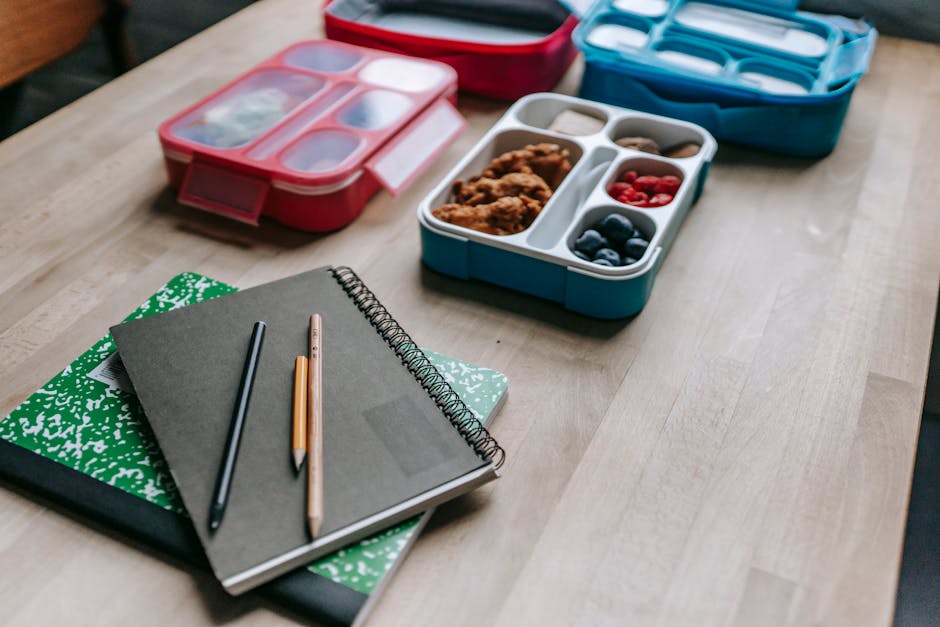
Matching Food Types to Reheating Methods
Not all meal prep foods reheat the same way. Below is a framework for common American meal prep categories, with recommended methods and specific techniques.
Grains and Starches
Rice, quinoa, pasta, and potatoes are meal prep staples, but they dry out faster than almost anything else in your refrigerator. The culprit is retrogradation: as cooked starches cool, their structure firms and releases moisture. Refrigeration accelerates this process.
For rice and grain bowls, the microwave works fine if you add moisture. Place your grains in a bowl, sprinkle 1 to 2 tablespoons of water over them, and cover with a damp paper towel before microwaving. The steam softens the starches without making the grains mushy. For fried rice or any grain where you want separated, slightly crisp kernels, use a hot skillet with a teaspoon of oil instead.
Pasta reheats best with sauce. Plain pasta clumps and dries; sauced pasta retains moisture and reheats evenly in the microwave or a covered skillet. If you meal prep plain pasta intentionally, toss it with a little olive oil before storing, then add a splash of water or sauce when reheating.
Sweet potatoes and regular potatoes respond well to almost any method. In the microwave, pierce the skin and wrap in a damp paper towel. In the oven or air fryer, a light coating of oil helps restore the original roasted texture.
Proteins
Chicken breast is notoriously unforgiving. Its low fat content means it overcooks quickly, and reheating often pushes it past the point of palatability. The solution is lower, slower heat. Slice breast meat before reheating to reduce the distance heat must travel. Use medium microwave power, or better yet, reheat sliced chicken in a covered skillet with a tablespoon of broth or sauce.
Dark meat chicken and fatty cuts like pork shoulder are far more forgiving. Their higher fat content buffers against drying, and they reheat beautifully in the microwave, oven, or stovetop. Ground meats fall somewhere in between, crumble them and stir frequently for even warming.
Fish and seafood are the most delicate. Prepped salmon or shrimp can go from tender to rubbery in 30 seconds of overheating. If you must microwave, use 50% power in 30-second intervals. The better approach is gentle stovetop reheating in a covered pan, or oven reheating at 275—F wrapped in foil.
Vegetables
Roasted vegetables are where countertop appliances shine. An air fryer at 375—F for 5 to 7 minutes restores the caramelized exterior that makes roasted broccoli, cauliflower, or carrots appealing. Microwaved roasted vegetables turn soft and lose their character.
Steamed or saut—ed greens reheat quickly in the microwave with minimal quality loss. Just avoid overcooking—they'll continue to soften as they sit. Raw vegetables meant to stay crisp, like cucumber or bell pepper in a grain bowl, should be stored separately and added after reheating the other components.
Sauces and Soups
Wet foods are the easiest category. Soups and stews reheat beautifully on the stovetop over medium heat, stirring occasionally. In the microwave, use a deep bowl to prevent splatter, and stop to stir halfway through. Cream-based sauces can separate if overheated; reheat them gently and whisk if needed.
Tomato-based sauces are microwave-friendly but can develop hot spots that splatter dramatically. A loose lid or microwave splatter guard prevents mess and helps even heating.
A Practical Comparison: Reheating Methods by the Numbers
The table below summarizes typical time, energy use, and best applications for each reheating method, based on common US household appliances and electricity costs averaged from the EIA's 2023 data.
| Method | Typical Wattage | Preheating + Reheating Time | Estimated Energy Cost per Use* | Best For | Biggest Weakness |
|---|---|---|---|---|---|
| Microwave | 700?1,200W | 2?5 min | $0.01?$0.03 | Soups, grains, sauced foods | Uneven heating, dries proteins |
| Conventional oven | 2,500?5,000W | 25?40 min | $0.15?$0.35 | Casseroles, roasted meals, batch reheating | Slow, energy-intensive |
| Stovetop (electric) | 1,200?2,400W | 5?12 min | $0.03?$0.08 | Stir-fries, soups, pan-seared proteins | Requires active attention |
| Toaster oven | 1,200?1,800W | 8?15 min | $0.03?$0.07 | Pizza, roasted vegetables, small portions | Limited capacity |
| Air fryer | 1,400?1,700W | 6?12 min | $0.03?$0.06 | Fried foods, crispy proteins, vegetables | Can overcook small items quickly |
*Based on average US residential electricity rate of $0.16 per kWh as of late 2023, per the US Energy Information Administration.
Building a Reheating Workflow That Actually Fits Your Life
Technique matters, but consistency matters more. The best reheating method is the one you'll actually use on a Tuesday when you're running late and hungry. Here's how to build a personal workflow based on common American schedules and kitchen setups.
The Office Reheater
If you bring lunch to a workplace with a shared microwave, your options are limited but not hopeless. Pack meals in microwave-safe glass or ceramic containers rather than plastic, glass heats more evenly and won't warp or stain. Separate components when possible: store sauce in a small silicone cup, crunchy toppings in a separate bag, and proteins sliced rather than whole.
Office microwaves are often abused and underpowered. Plan for longer reheating times at lower power settings. If your office kitchen has a toaster oven, use it for anything where texture matters. I've had clients in Chicago's Loop who keep a small air fryer under their desk for this exact purpose.
The Hybrid Worker
Splitting time between home and office means you need two reliable systems. At home, you can use your full appliance suite. Many of my clients batch-prep two types of meals: ones that reheat well in the microwave for office days (soups, stews, sauced pasta) and ones that benefit from oven or air fryer reheating for home days (roasted proteins and vegetables, grain bowls with crispy components).
The Family Feeder
Reheating for multiple people changes the math. The oven or multiple stovetop burners becomes more efficient than individual microwave rounds. Consider prepping family-style casseroles or sheet-pan meals that reheat as a unit. A 9x13 inch dish of baked ziti or a foil-covered tray of chicken and vegetables feeds four with one reheating session and minimal cleanup.
Pro Tip:Label your prepped containers with both the date and the recommended reheating method. A strip of masking tape and a Sharpie takes 10 seconds and eliminates the Wednesday-morning decision fatigue of figuring out how to warm each container. Example labels: "MW 2 min, stir" or "Air fry 375—F, 6 min."
Food Safety: The Non-Negotiable Basics
No reheating guide is complete without addressing safety. The USDA recommends the "two-hour rule": perishable foods should not sit at room temperature for more than two hours (one hour if the ambient temperature is above 90—F, which matters for summer picnics and office environments with unreliable cooling).
When reheating, aim for an internal temperature of 165—F throughout the food. This is especially important for poultry, ground meats, and casseroles containing eggs or dairy. A simple instant-read thermometer costs $10 to $15 and removes all guesswork. I keep one in my desk drawer at the office.
Repeated cooling and reheating degrades both safety and quality. Try to reheat only the portion you'll eat. If you prepped a large container of chili, portion it before refrigerating rather than reheating the entire batch multiple times.
Key data point:The CDC estimates that 48 million Americans get sick from foodborne illness each year, with leftovers and improperly reheated foods contributing significantly to cases caused bySalmonellaandClostridium perfringens.
Common American Meal Prep Foods: Specific Reheating Guidance
To make this concrete, here are reheating instructions for meal prep foods I see most often in my practice.
Chicken burrito bowls:Microwave the rice and beans with a damp paper towel for 90 seconds. Add sliced chicken and microwave another 60 seconds at 70% power. Top with cold salsa, guacamole, and any crunchy elements after reheating.
Overnight oats or chia pudding:These are meant to be eaten cold. If you insist on warming them, use the stovetop with a splash of milk, stirring constantly. Microwaves turn chia pudding into a rubbery mass.
Meatloaf with mashed potatoes:Slice meatloaf into 1-inch pieces. Arrange on a microwave-safe plate with potatoes, cover with a damp paper towel, and microwave at 70% power for 3 to 4 minutes. Alternatively, reheat in a covered skillet with a tablespoon of beef broth.
Sheet-pan salmon and vegetables:This combination is challenging. Reheat vegetables in an air fryer at 375—F for 5 minutes. Warm salmon separately in a covered skillet over low heat with a teaspoon of water, or eat it cold flaked over a salad.
Breakfast egg muffins or frittata:Wrap in a damp paper towel and microwave at 70% power for 60 to 90 seconds. The moisture prevents the eggs from turning rubbery.
Prepped burgers or meatballs:Slice in half to reduce thickness. Reheat in a hot skillet with a lid, or in a toaster oven at 350—F for 8 to 10 minutes. Microwaves work in a pinch but will soften any seared exterior.
Your Reheating Checklist
Before you reheat your next prepped meal, run through this quick checklist:
- Check that the food has been refrigerated within two hours of cooking and stored at 40—F or below.
- Choose the reheating method that best matches the food type and your available time.
- Add moisture (water, broth, or sauce) to grains, starches, and lean proteins before microwaving.
- Use lower power settings and longer times for dense or delicate proteins.
- Stir, flip, or rotate food halfway through reheating to even out hot spots.
- Verify an internal temperature of 165—F with a thermometer for poultry, ground meats, and egg dishes.
- Keep cold toppings, raw vegetables, and crunchy elements separate until after reheating.
- Reheat only the portion you plan to eat; avoid repeated cooling and reheating of the same batch.
The Bigger Picture: Reheating as a Meal Prep Skill
Meal prep is often framed as a cooking skill, but it's really a logistics skill. The cooking is just one phase in a longer chain that includes storage, transport, and final preparation. Reheating is the last mile—the point where all your Sunday effort either pays off or falls apart.
"The clients who stick with meal prep long-term aren't necessarily the best cooks. They're the ones who figured out how to make Wednesday's lunch taste almost as good as Sunday's dinner."
Investing in better reheating doesn't require new gadgets or complicated techniques. It requires paying attention to what happens after the food goes into the refrigerator. Match your method to your meal. Add moisture where it's needed. Use lower heat for proteins. Keep textures separate until the end. These small adjustments compound into meals you actually want to eat, which means less food waste, less money spent on takeout, and a meal prep habit that lasts.